Thursday, July 30, 2009

Fourth of July Snack Holders

These are cute and really convenient for small snacks!

{from skiptomylou.org}

I am thinking a stack of these sitting next to a bowl of snacks is great—–makes nice portable containers for backyard guests.Print out the template and fold into a cone. It overlaps at the top about about two inches to no overlap at the point. You could easily use tape to fasten, but I used hot glue. My local printing store was running a special so I saved the file to a flash drive and had them print directly from the file. They did look much better than if I had printed them on my printer, plus the color copy paper is heavier with a nice sheen.Cheers to you!

Tissue / Cough Drop Holder

So cute! And I love cough drops when I'm sick, so this would be perfect to carry them around in!

{from stampasweetimpression.blogspot.com)Hi everyone! Laurie here, and I've got a fun little project to share...with a tutorial! During the May's release Sneak Peeks, I shared THIS tissue holder that I made with the new Doctor's Orders set. I received many requests to share a tutorial, so here it is! :-)

To start, you will need a piece of cardstock that measures 4 5/8" x 8" and another piece that measures 4 1/2" x 6 1/2".First, you will need to score both pieces of cardstock. The 4 5/8" x 8" piece needs to be scored at 1 1/2", 2 5/8", 5 1/4", & 6 3/8" (make sure that the c.s. is horizontal).Score the smaller piece of c.s. at 1" on all four sides as shown in the picture below.Using a bone folder, crease each fold well (this makes for a neater box).Next, make four vertical slits to create little "flaps" in each corner as shown in the picture below.This next step is optional, but one that I think makes for a nicer end product. Cut part of each flap off (making diagonal cuts) as shown in the picture below.
Finally, assemble boxes using strong adhesive (like Taylor's Sticky Tape) and place a small folded ribbon on one end of the bottom box (this will be the ribbon pull that is used to open the box).For my finished box, I placed a piece of layered and decorated c.s. measuring 4 12" x 2 1/2" on the top. The adorable tissue box (from Doctor's Orders) is stamped on Choice Buttercream c.s. and colored in with Copics. The decorative layer underneath the tissue box was created using my Labels Four Nestabilities. For embellishments, I added some Stickles and buttons!

Tuesday, July 28, 2009

Mosaic Picture Frame

So cute, and with retro plates would be awesome!

{from how-tostudio.com}

Anyone can mosaic. Whether you’re tackling a simple project or an intricate design, mosaics are fun, easy and relatively inexpensive. Plus, they make great gift for just about anyone!MostlyMosaic from Etsy brought us this great picture frame mosaic project. Check out her store where you can find more of her work and even purchase the picture frame featured in this design! Here’s the project:

STEP 1. Find at least two plates that go well together. (The artist used two plates in this project.) To save money, check your local thrift shops and garage sales.STEP 2. Place the plates (one at a time) between several layers of newspaper. While using safety glasses and gloves, start breaking the place with a hammer.STEP 3. After the first couple of hits, check your plate to see how it’s breaking apart. Since you’re looking for pieces that will work for your overall design, sort through the glass and remove any pieces that you won’t use. (This might include pieces that do not have smooth backs or pieces that might have gotten chipped on the front.)STEP 4. Continue breaking your plate into smaller pieces. Then repeat steps 2-4 with your other plates.STEP 5. Take your wooden picture frame. Starting in the corner, start gluing pieces from your plates down using craft glue. (Some people choose to layout the entire design before doing any gluing. But the great thing about mosaics is you don’t have to worry about being perfect!)STEP 6. Fill as much of the wood as possible, using the small pieces to fit in tight spots.

STEP 7. After you’ve given your project sufficient time to dry (12 to 24 hours), mix up your grout. You want it thick enough so that you can’t pour it out.STEP 8. Spoon the grout onto the mosaic surface and push it into all the cracks. Make sure you use gloves during this process, as some of the glass will have sharp edges.STEP 9. Use a wet rag to wipe off the excess grout. This might get pretty messy, but just take your time.STEP 10. Let the grout sit for 20 to 30 minutes, and then use a damp rag to finish cleaning up.STEP 11. If you like, you can choose a coordinating acrylic paint for the edges of the frame.Enjoy your new piece of art! Then start digging around to see what else you can find to mosaic. What else have you done mosaics with? Please share your ideas with everyone in the comments section!

Wire Wrapped Ring with a Bead!

A ring like the one below, but with a bead or jewel in the center! So cute!
http://caseyacrossthepond.blogspot.com/2008/02/wire-wrapped-ring-tutorial.html

{from caseyacrossthepond.blogspot.com}

Whenever I show someone these rings, people thing I'm like a super-talented jewelry designer person or something. Which I'm not. I'm just good at making relatively simple things look really impressive...and now you can too! These rings are great for gifts!

I didn't remember to turn my macro on until I was almost finished. Sorry about the blurry photos!

Materials needed:

About 18 inches of 22 gauge wire (can be craft wire, sterling silver, gold-filled, whatever)
Bead or stone (8-12 mm is the best size)Ring mandrelwire cutters
chain nose pliersStart by placing your bead onto the wire, about 2/3 of the way along.Begin placing your wire on your mandrel. Start a full ring size bigger than what you intend your finished ring to be. I am starting at 8 because I want my finished ring to be a size 7.Turn your mandrel over and position the bead in the channel. Now you're ready to start wrapping!Holding the the bead in the channel, wrap each side of the wire aroubd the mandrel twice. Once you have done that, the front will look like this (3 loops of wire showing):And the back will look like this (4 loops of wire showing):Pinch your wires together and push them under your bead. Make sure the back wires don't get criss-crossed!Check the short end of the wire. Is it coming up from the bottom or top? Either way is fine, but don't cross over when you start wrapping! Take the short end of the wire and wrap it around the bead once, crossing to the other side. Leave it there.

Take the long end of the wire and begin wrapping it. The first time around, just go slightly away from the bead. The second time around, go as close to the bead as possible. The third and subsequent times, wrap away from the bead. Keep going until you are satisfied with the look (or you run out of wire!)

Take the ring off the mandrel.

Take the loose ends of the wire on one side and wrap it around and around the band until you are satisfied with the look. (Some people go all the way arounf the band, but I'm not a fan of that look). Count the number of wraps. Now do the same amount of wraps on the other side.

Trim the ends of the wires as close to the band as possible.

Use the chain nose pliers to smoosh the end flat so that it won't stratch your finger...it can be sharp!

Straighten and smooth the band by beating it to death. You can use a tack hammer, but I like to use the soft-grip handle of my crimper because there's less of a chance of marring the wire.Take it off the mandrel, check it, admire it, then put it on your finger and when people ask where you got it, you can say, "I made it!" and everyone will gasp in amazement!Hints and tips:

Around 90% of people can wear a size 7 ring on at least one of their fingers, so when in doubt, make it size 7!

Craft wire and base metals are the easiest to work with. Fine metals, such as sterling and gold-filled, are more sproingy...if you loosen your grip at all before you wrap the sides, your ring will spring open and your beads will fly everywhere! Practice a bit with the craft wire before venturing on to fine metals.

Round beads are easiest to work with. Flat beads are the hardest because the wires won't stay under the bead when you pinch them together before wrapping.

You can use more than one bead! Experiment!

Don't get too frustrated. It does take practice!

If you find you're feeling like you don't have enough hands, feel free to place the mandrel between your knees. That's what I do! I like to think I'm working my thighs as I am squeezing the mandrel with my knees. :)

Monday, July 27, 2009

Wire Ring

I want to make one of these ASAP! And in all different colors! So cute!{from http://www.how-tostudio.com)

We are back in 2009 with a great new how-to from Katie of Airy Fairy Jewelry on Etsy.

FYI: Starting next week, I'll be mixing up my how-to format just a bit. Instead of step-by-step instructions, I will be offering general how-to tips and ideas from Etsy artists (with great gift certificates each week as well). This will open things up a great deal on who can be featured. So if you are an Etsy artist but don't necessarily have a full how-to, shoot me an e-mail for the chance to be featured.

Okay, moving on to the how-to this week where you can learn how to make this amazing wire ring! And be sure to check back tomorrow where you can enter to win a great gift certificate from Airy Fairy Jewelry.

Materials: Flush cutters, flatnose pliers, end cutters, 22-gauge bronze artistic wire, 24-gauge red artistic wire, and something round and wide enough to represent your finger. (A ring mandrel is preferred, but Katie didn't have one so she used the top of this nail polish bottle. You can also use a wooden dowel.)
Step 1: Cut about eight inches of 22-gauge wire with the flush cutters and place the center of it around your ring mandrel. Cross both halves of the wire as shown.
Step 2: Pull both halves of the wire around the nail polish again making sure that the top and bottom wires are parallel.Step 3: Twist the top and bottom wires together in a clockwise motion.
Step 4: Continue twisting clockwise, pulling one wire around the knot and then pulling the other wire around. Continue until the knot is as big as you desire.Step 5: Using the end cutters, cut off the excess wire from the knot you just made. Try to cut as close to the knot as possible.
Step 6: Use the flatnose pliers to push the cut edges flat up against the knot, this way they won't poke anyone or get snagged on clothing.
Step 7: Cut about 12 inches of the 24-gauge wire and hold it flat against the underside of the ring. Wrap the 24-gauge wire around the ring.
Step 8: Continue wrapping around the ring until you get to the knot.
Step 9: Wrap the wire around the knot 3 or 4 times, making sure that when you are done the extra wire is sitting on the unwrapped side of the ring.Step 10: Take the extra wire and wrap around the other side of the ring. Cut off any excess wire and use the flatnose pliers to make sure that the ends of the wire are pressed firmly up against the ring. And you're done!

Picture Frame Jewelry Case

Love this cute idea to store jewelry!{from http://www.how-tostudio.com}

Is your jewelry all knotted together in the bottom of a drawer? Are you always looking for a piece that you know “is in there somewhere?” We recently found the perfect solution for this dilemma from the unique and innovative Etsy artist, Uncorked.

She makes this unique hanging jewelry box from picture frames. It’s such a cool idea! Take a look at her shop and click on “Recycled Cases N Boards” off to the right to see the different styles she offers. (She does amazing cork jewelry, too. Definitely a seller to watch!) Thanks Cat!
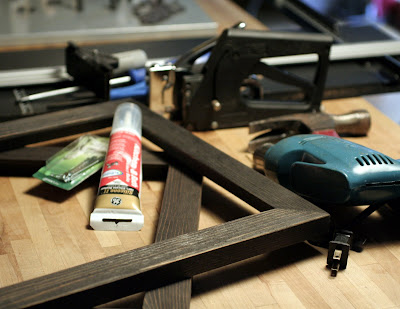

Stuff You Will Need

• 2 picture frames of the same size (the deeper the better with square edges)
• 2 hinges with hardware
• 1 latch with hardware
• Foam board (cut to fit inside one of the frames)
• Fabric (dense weaves are best)
• A piece of glass to fit one of the frames
• Silicone sealant (clear for kitchen and bath)
• Staple gun
• Glazier points
• Hanging hardware (saw tooth hanger)
• Drill or dremel
• Clamps
• ScrewdriverStep 1. Line Up Your Frames
Marry your frames by standing them up on a table and fitting the interiors together. Sometimes you have to turn one in a different direction to get the perfect line. Check your corners and sides. If your frames are out of line, give them a quickie divorce and get yourself two frames that want to live happily ever after together. (If you skip this step, it will be at your own risk!) Once your frames do line up, protect your wood with cardboard and then clamp the two sides together with the interiors facing each other.Step 2. The Hinges
Line up the top of the hinge with the top of the interior frame. Set your hinges in place, mark the screw holes, remove the hinges, pre-drill your holes and then secure the hinges with a screwdriver. Repeat for the bottom.Step 3. The Latch
Determine which frame will be the front of your jewelry case. Measure to find the center (unless you are an off-center kind of girl), lay out your latch so that it opens toward the frame you would like to be the front of your case, mark screw holes with an awl, pre-drill holes for latch hardware, and finally, secure latch hardware with a screwdriver.Step 4. The Glass
Clean your glass; you need it clean to get a good seal and you want to check for any scratches or mars along the way. Open your case. Lay your glass into the front frame. Gently hold a slight pressure down on your glass as you apply a continuous 1/4-inch (approx) bead of clear silicone along the entire inside edge of the front frame; applying the silicone to the location where the glass meets the frame. This will hold the glass in place. Allow this to dry for 24 hours.Step 5. The Big Finish
Lay your foam, which you have cut to fit inside the back frame on top of the fabric you’ll be using as a backdrop for your jewelry. Cut the fabric about 2 inches larger than the foam all the way around (you may want to iron your fabric at this point). Fold the fabric around the foam (with the outside of your fabric facing away from the foam) and secure it with a staple gun. Cat uses 6mm staples so they will not poke out the other side. Staple one side and then the opposite side pulling tightly until all four sides are secured. Fold your corners like you are wrapping a birthday present and staple. Cut away excess fabric. Cut a piece of cardboard the same size as the foam (usually something you can use will come with the frame). Lay the cardboard into the back frame, and lay your fabric covered foam panel on top of the cardboard.Step 6. Hang it Up
Now your ready to hang your masterpiece. Use a screwdriver to push 8 glazier points into the frame on top of the fabric panel (two points on each side). Add your hanging hardware to the back by measuring to find the center and then nailing in the hardware. Use a long saw tooth hanger so the case can be adjusted for weight when hanging.Step 7. Extra Touches
Hang in style by using corsage pins (available at craft stores, florists, etc.). And for an extra little something, store your pins in a test tube container. (Cat will provide these for FREE; all you have to do is pay the $2 for shipping!

Monster Mash

Such a cute little treat!
{from http://www.stolenbonbons.com}

You know you want to make this super easy fun and fast Halloween treat. The kids loved it and so did I.

Monster Mash

6 white bark chocolate squares
1 cup pretzel sticks
2 cups honey graham cereal
1 cup Halloween Color M&Ms
1 cup miniature marshmallows
orange food coloring
chocolate sprinkles

1. Melt 2 squares and then add pretzel sticks, coat well and place separately on wax paper until chocolate is hard.

2. Once chocolate is set/hard melt the remaining 4 squares. Once melted add orange food coloring.

3. Add 1 cup of honey graham cereal to half of melted chocolate and mix until the cereal is well coated with chocolate.

4. Add remaining ingredients... cereal, M&Ms, marshmallows, remaining chocolate, mix, add pretzels and chocolate sprinkles mix well.

5. Spoon out mixture in large clusters onto wax paper. Let the chocolate set and then eat.

Photo Letter Frames

Love this idea. I need to start looking around for all the letters, so I can use my own pictures.

{from http://moonburst37.blogspot.com}

You've seen them in model homes, designer dream showcases and on the Oprah show. They're gorgeous and a true conversation piece. Letter Perspectives is the creator and it is the gift you give to someone who has everything, but only if you can afford to drop $150 as a starting price. OR, yes there's an or, you can DIY it for a fraction of the cost.

Begin with your idea, what do you want you frame to
say? It could be your last name, it could be the traditional things like HOPE, FAITH, LOVE, FAMILY, it could be KITCHEN, or do a sports theme for BASKETBALL. Whatever you get the point. I chose to do WELCOME, so that I could put it in the entry hall.


You can either take the pictures yourself or you can use the work of others. Sites like Flickr allow you to save photos for free (as it was pointed out, let me make it clear you can save photos for free for your own personal viewing pleasure, professional photographers who post on Flickr typically have a setting so they can't be downloaded and/or watermarked images) or you can subscribe to sites like iStockphoto, for a minimal charge and download professional images. So start searching for images, things related to the style you want to use. So if your word is KITCHEN, look for images of things like utensils or spices. If your word is BASKETBALL, look for images like nets, balls, bleachers, hoops or courts. I've got a great start with the help of a friend (Gatorhightowers) for you here. So once you've gotten some great images you might have to do a little photo-shopping on them to get your desired letter.

Then just upload your letters to a photo print site like shutterfly or snapfish, where you can print 4x6 or 5x7 prints for as little as .15 cents.

Once you get your letters in it's time to start shopping for a frame. If you choose an uncommon number of slots, say a 7 4x6's frame is going to be difficult to find pre-made. However you can look for a frame that will match your dimensions and have a matt made for usually under $30. My suggestion would be to watch the flyers for a 50% off coupon and use it to buy your odd sized frame. That is how I was able to purchase a $50 frame for $25. Which brought my frame costs to only $35.00. Much better than $150!